Repotting a plant can feel intimidating, especially if you’re new to plant care. I remember the first time I decided to repot one of my plants—I was nervous, unsure, and worried I might do more harm than good. But over time, I’ve learned that repotting is not only simple but also one of the most rewarding aspects of plant care. It’s like giving your plant a fresh start, and watching it thrive afterward is incredibly satisfying.
In this guide, I’ll walk you through the entire process of repotting a plant, step by step. Whether you’re a seasoned plant parent or a beginner, these easy instructions will help you give your plants the care they deserve.
Why Repotting is Important
Before we dive into the how, let’s talk about the why. Repotting is essential for your plant’s health and growth. Over time, plants outgrow their pots, and their roots can become cramped and tangled. This can lead to stunted growth, nutrient deficiencies, and even root rot.
Repotting gives your plant:
- More Space: Room for roots to grow and spread.
- Fresh Soil: Nutrient-rich soil to support healthy growth.
- Better Drainage: Improved airflow and water drainage to prevent root rot.
Knowing when to repot is just as important as knowing how. Look for these signs:
- Roots growing out of the drainage holes.
- The plant becoming top-heavy or unstable.
- Soil drying out too quickly after watering.
- Visible salt or mineral buildup on the soil surface.
If you notice any of these signs, it’s time to repot.
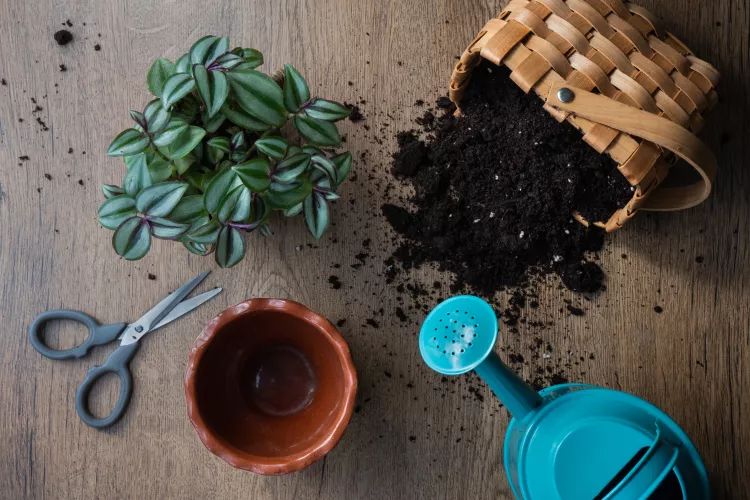
Step 1: Gather Your Supplies
Before you start, make sure you have everything you need. Here’s what I always keep on hand:
- A New Pot: Choose one that’s 1-2 inches larger in diameter than the current pot. Make sure it has drainage holes.
- Fresh Potting Mix: Use a high-quality mix suited to your plant’s needs (e.g., cactus mix for succulents, orchid mix for orchids).
- A Trowel or Scoop: For handling soil.
- Pruning Shears or Scissors: To trim any dead or overgrown roots.
- Gloves: To protect your hands, especially if you’re working with plants that have thorns or irritants.
- Watering Can: To water the plant after repotting.
Step 2: Prepare the New Pot
Start by preparing the new pot. If you’re reusing an old pot, make sure to clean it thoroughly to remove any dirt or pathogens.
- Add Drainage Material: Place a layer of small stones, broken pottery, or a coffee filter at the bottom of the pot. This helps improve drainage and prevents soil from escaping through the holes.
- Add Fresh Soil: Fill the pot about one-third full with fresh potting mix.
Step 3: Remove the Plant from Its Current Pot
This is where the real work begins. Here’s how I do it:
- Water the Plant: A day or two before repotting, water the plant thoroughly. This makes it easier to remove the plant from its pot.
- Gently Loosen the Plant: Turn the pot upside down while supporting the plant with your hand. Tap the bottom of the pot or squeeze the sides to loosen the root ball.
- Inspect the Roots: Once the plant is out, gently shake off excess soil and inspect the roots. Trim any dead or rotting roots with clean pruning shears.
Step 4: Place the Plant in the New Pot
Now it’s time to give your plant a new home.
- Position the Plant: Place the plant in the center of the new pot, ensuring it’s at the same depth as it was in the old pot.
- Add Soil: Fill in around the roots with fresh potting mix, gently pressing it down to eliminate air pockets. Leave about an inch of space at the top to make watering easier.
Step 5: Water and Care for Your Repotted Plant
After repotting, your plant will need a little extra TLC.
- Water Thoroughly: Give the plant a good drink to help it settle into its new home.
- Avoid Direct Sunlight: Place the plant in a shaded area for a few days to reduce stress.
- Monitor Growth: Keep an eye on your plant over the next few weeks. You may notice some drooping or yellowing as it adjusts, but this is normal.
Tips for Success
- Choose the Right Time: The best time to repot is during the growing season (spring or early summer) when plants are most resilient.
- Don’t Overpot: Avoid choosing a pot that’s too large, as this can lead to overwatering and root rot.
- Be Gentle: Handle the roots carefully to avoid damaging them.
Repotting a plant doesn’t have to be stressful. With these easy steps, you can give your plants the fresh start they need to thrive. Remember, every plant parent learns through experience, so don’t be afraid to get your hands dirty. Your plants will thank you for it!


+ There are no comments
Add yours