When I first started my container garden, I made the mistake of assuming all potting soil was the same. I quickly learned that the quality of your soil can make or break your plants. Poor soil can lead to stunted growth, nutrient deficiencies, and even plant death. Over time, I’ve developed a routine for testing my potting soil before planting to ensure my container garden thrives.
If you’re planning a container garden, testing your potting soil quality is a crucial first step. In this guide, I’ll walk you through everything you need to know to test your soil and set your plants up for success.
Why Test Your Potting Soil?
Potting soil is the foundation of your container garden. It provides nutrients, supports root growth, and ensures proper drainage. Testing your soil helps you:
- Identify Nutrient Levels: Ensure your plants have the nutrients they need to grow.
- Check pH Balance: Determine if the soil is too acidic or alkaline for your plants.
- Assess Drainage and Texture: Ensure the soil is well-draining and has the right texture for root growth.
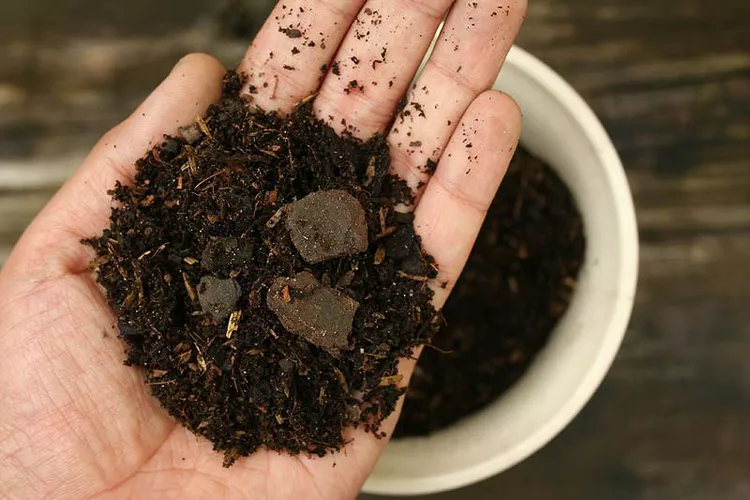
Step 1: Check the Soil Texture
The texture of your potting soil affects its drainage and aeration. Here’s how to test it:
- Take a handful of moist soil and squeeze it gently.
- Open your hand and observe:
- Ideal Soil: Holds its shape briefly before crumbling.
- Too Sandy: Falls apart immediately.
- Too Clayey: Stays in a tight ball.
Fix It:
- If the soil is too sandy, add compost or coconut coir to improve water retention.
- If the soil is too clayey, mix in perlite or coarse sand to improve drainage.
Step 2: Test Soil Drainage
Proper drainage is essential to prevent root rot. Here’s how to test it:
- Fill a pot with your potting soil and water it thoroughly.
- Observe how quickly the water drains:
- Ideal Drainage: Water drains within a few seconds.
- Poor Drainage: Water pools on the surface or drains very slowly.
Fix It:
- Add perlite, pumice, or coarse sand to improve drainage.
Step 3: Check Soil pH
Soil pH affects nutrient availability. Most plants prefer a slightly acidic to neutral pH (6.0-7.0). Here’s how to test it:
Using a pH Test Kit
- Collect a soil sample and mix it with distilled water.
- Dip the pH test strip into the mixture and compare the color to the chart provided.
Using a pH Meter
- Insert the pH meter probe into moist soil.
- Read the pH level on the display.
Fix It:
- If the soil is too acidic (below 6.0), add lime to raise the pH.
- If the soil is too alkaline (above 7.0), add sulfur or peat moss to lower the pH.
Step 4: Test Nutrient Levels
Nutrient-rich soil is essential for healthy plant growth. Here’s how to test it:
Using a Home Test Kit
- Collect a soil sample and follow the instructions on the test kit.
- Check the levels of key nutrients like nitrogen (N), phosphorus (P), and potassium (K).
Sending to a Lab
For more accurate results, send a soil sample to a local extension service or lab.
Fix It:
- If nutrients are lacking, add a balanced fertilizer or organic amendments like compost or worm castings.
Step 5: Check for Soil Contaminants
Contaminated soil can harm your plants and even pose health risks. Here’s how to check:
- Look for signs of mold, fungus, or pests in the soil.
- If you suspect contamination, send a sample to a lab for testing.
Fix It:
- Replace contaminated soil with fresh, high-quality potting mix.
Step 6: Assess Organic Matter Content
Organic matter improves soil structure and nutrient availability. Here’s how to test it:
- Take a handful of soil and examine its texture and color.
- Healthy soil should be dark, crumbly, and smell earthy.
Fix It:
- If the soil lacks organic matter, mix in compost, aged manure, or coconut coir.
Step 7: Perform a Plant Test
If you’re still unsure about your soil quality, try a plant test:
- Plant a fast-growing, hardy plant (like radishes or beans) in the soil.
- Observe its growth over a few weeks:
- Healthy growth indicates good soil quality.
- Poor growth suggests issues with nutrients, pH, or drainage.
Final Thoughts
Testing your potting soil before planting is a simple yet crucial step for a thriving container garden. By ensuring your soil has the right texture, drainage, pH, and nutrients, you’ll give your plants the best possible start. So take the time to test your soil—it’s an investment that will pay off in healthy, vibrant plants and a bountiful harvest.


+ There are no comments
Add yours